Thursday, November 8, 2007

Okonomiyaki Party

okonomiyaki01

My favorite get togethers involve food especially when someone else is cooking! Despite never having had "real" Osaka-style okonomiyaki (ie. in Osaka or Japan) I love the stuff. I've also found that it makes for a great "make-it-yourself" party food. Just prepare the batter, fillings and toppings ahead of time, set out hot plates and instructions and just let your friends cook their own damned food!

For an okonomiyaki party, I provide:
  • Okonomiyaki batter
  • Eggs
  • Shredded cabbage and/or chopped kimchee
  • Various batter add-ins, meats, toppings
Here's a list of stuff I try to provide for okonomiyaki parties, budget and time willing. In addition to this, I also like to make up a batch of yakisoba so that people can make modern-yaki if they so choose.
Batter add-ins
  • Cooked bacon bits (optional)
  • Shredded cheese (optional)
  • Baby shrimps (optional)
  • Tenkasu/tempura bits (optional)
Meat
  • Bacon (thin sliced)
  • Beef (thin sliced)
  • Sausage (thin sliced)
  • Spam (thin sliced)
Toppings
  • Okonomiyaki sauce
  • Kewpie Mayonaise
  • Aonori (seaweed flakes)
  • Bonito flakes
  • Chopped Green Onions (optional)
  • Shoga (pickled ginger)
  • Corn kernels
I confess: I use a ready made mix for the okonomiyaki batter. Just add water. Since I've always done okonomiyaki for parties, I haven't really had the opportunity to experiment with non-ready made okonomiyaki mix lest it come out icky. The most important ingredient in the okonomiyaki batter is the 山いも (yamaimo) or mountain yam. It is what gives the okonomiyaki its texture and taste.

When looking for okonomiyaki batter mixes in your Japanese grocery store, look for it in the section that has other ready made mixes such as pancake mixes. (Don't substitute pancake mix for okonomiyaki mix. It's the wrong flavor and texture for this.) I've discovered that more general Asian markets tend not to have it in stock but it's always worth a shot if you don't have a Japanese grocery store near by. Always make sure that the mix includes "mountain yam" or "yamaimo" in the ingredients list. Otherwise, you won't have the same texture or flavor that you should.

If you don't have access to a Japanese grocery store to find okonomiyaki mix, Kirk of mmm-yoso has a great looking recipe that includes yamaimo here:
http://mmm-yoso.typepad.com/mmmyoso/2006/05/okonomiyaki.html

I've found that most general Asian markets will have "nagaimo" or "yamaimo" in stock in their fresh produce section. Where I am, they're usually packaged in pre-wrapped, single packages and may have a covering of sawdust on them.

Fillings and toppings are very much up to everyone's taste. At the very least, I provide green onions, okonomiyaki sauce and kewpie mayonaise. I have an indecent love for kewpie, as evidenced by the many times I've asked for extra mayo at Izumiya in San Francisco and consequently have been given a bowl to dip my okonomiyaki in. It sounds gross but I love it!

For parties, I've found it's good to either demonstrate or (if you have the time/energy/want to) you could print out instructions or designate a short-order chef. What follows are the instructions I wrote up for my latest okonomiyaki party (but didn't get to use) ;) Feel free to change it to suit your party.

* *
OKONOMIYAKI お好み焼き literally means "Grill as you like"
Here it means: Cook your own damned pancake! :)

Often compared to pizza for its customizability, okonomiyaki has several styles, depending on where in Japan you're eating. We're going to do the Kansai style of okonomiyaki which is basically a savory pancake filled with cabbage and other yummy things.

Step 1: Mixing it up!
Scoop a ladle full of batter into the bowl
Add one egg
Add some cabbage or kimchee (or both)

You can also add all/some/none of the optional filling ingredients to the batter.
  • Bean sprouts
  • Chopped Green Onions
  • Cooked bacon bits
  • Shredded chees
  • Baby shrimp
  • Chopped fake crab
  • Tenkasu/tempura bits

If you find the mixture too thick and chunky, you can add more batter. It all depends on how much dough to filling you'd like.

Mix up the okonomiyaki batter, eggs and fillings in the bowl until well blended.

Step 2: Cooking It!

Oil up the ho
t plate with a good amount of cooking spray and spread the batter evenly.

While the batter is cooking, lay a few pieces of the meat (bacon, sausage, spam, etc.) onto the cooking pancake.

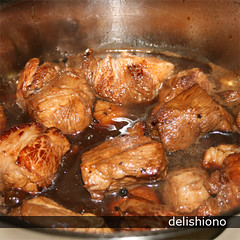
Let it cook on the first side for about 3 minutes and then flip (carefully) and cook on the other side for about 3 to 4 minutes to make sure that the meat is completely cooked. Feel free to squish the pancake every now and then to make sure it's cooked

Step 3: Topping it!
Once your okonomiyaki is cooked, remove it to a plate (I suggest meat side up) and start topping it.

Your choice of toppings are:
  • Okonomiyaki sauce
  • Kewpie Mayonaise
  • Aonori (seaweed flakes)
  • Bonito flakes
  • Benishoga (pickled ginger)
  • Corn kernels

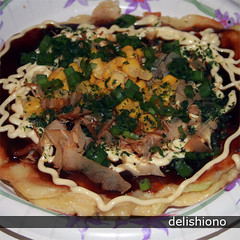
For traditional Osaka-style okonomiyaki, top it with some okonomiyaki sauce and mayo and a sprinkling of aonori and bonito flakes. Watch as the bonito flakes start to move on their own from the heat. Oooh, spooky.

Otherwise, top to your hearts content and then pig out!

For the advanced folks - モダン焼き(modern yaki)
Fry up an okonomiyaki like you usually would

Next to it, fry up an over medium egg.

Remove the okonomiyaki to a plate. Top with a generous amount of yakisoba. Top the yakisoba with the egg. Top the egg with the various okonomiyaki toppings of your choice.

Pig out and then roll around in the blissful, carb induced coma that you'll find yourself in later.

Pork Adobo

Pork Adobo

Growing up Filipino, pork adobo was one of those foods I took for granted. Like it or not, it was one of those dishes that regularly showed up on the table. After I moved away from my parents home, I found myself craving adobo every now and then but couldn't stomach the idea of eating restaurant adobo. For one, it was often far too expensive for what it is. Furthermore, I am of the zealous opinion and that most Filipino food is far better cooked on the home stove than enjoyed in a restaurant though I am happy to report that more Filipino cooks are expanding into the restaurant business with great success, especially in the SF Bay Area.

Even so, adobo is one of those memory evoking dishes that most Filipinos are adamant about what it should be and how it should taste. Adobo, like many things, is a family recipe, handed down through the generations and jealously guarded. One family's adobo may be a straight forward dry stew of chicken and pork whereas another's may have sauteed onions and potatoes swimming in a rich broth. What remains constant amongst most Filipino recipes is the necessity for soy sauce, vinegar, garlic, peppercorns and bay leaves. These are the main flavoring ingredients. The extras and cooking method are what varies greatly between families.

I often see adobo listed as a braised dish but that varies from family to family. Traditionally, braising calls for the searing of the meat and then being cooked slowly in an acidic broth. Many recipes for adobo that I've seen actually do this in reverse: first the meat is cooked in the vinegary marinade, removed from the cooking liquid, pan fried and then the sauce is returned to the pan to reduce. Some recipes ignore the pan frying all together and just cook the meat in the marinade and serve.

My perfect adobo with rich pieces of braised meat sitting in a deep mahogany broth. Chicken is fine and good but for me, pork is the ultimate adobo meat. When done right, the meat is full flavored and tender with the connective tissue and fat melted away into mouth filling bliss.

This is my version of this classic dish. It's quite a bit more work than the adobo my parents made while I was growing up. But the rich broth and meat make it totally worth it every second. Also note that adobo is one of those dishes that actually tastes better on the second or third day.

I also happen to like potato in my adobo, an addition I didn't know about until I had the adobo that my ex's mother made. Some people don't like potato because it's such an obvious filler ingredient but I love it because it soaks up all the cooking juices and tastes delicious. I omitted it here because I couldn't find my vegetable peeler today.

Pork Adobo
  • 2 lbs pork butt, cut up into 1 inch cubes
  • 1/2 c white vinegar
  • 1/2 c soy sauce
  • 1/2 c unsweetened pineapple juice
  • 2 tbsp whole pepper corns
  • 6 garlic cloves, smashed
  • 3 bay leaves

adobo-process01

Make your marinade by combining the vinegar, shoyu, pineapple juice, pepper corns, garlic and bay leaves. Pour over your pork butt and then marinate for one hour. Do not marinate too long as the acide from the vinegar and pineapple juice will begin to chemically cook the meat.

adobo-process02 adobo-process03

Pre-heat your oven to 325F. Remove your meat from the marinade and drain, reserving the marinade as this will also be your braising liquid. In an oven safe pot or dutch oven, heat about a tablespoon of oil at about medium high. Brown your drained meat in batches, making sure not to crowd the pan.

adobo-process05 adobo-process06

Once all the meat has browned, deglaze the pan with the marinade, making sure to scrape all the browned bits off of the bottom. Return the meat to the pan. Cover and cook in the oven for 30 minutes until the pork is cooked through and tender.

Serve with white rice.

Defatting the broth (optional)

If you're watching your fat/cholesterol intake (and who isn't?) you may want to defat your broth. Otherwise, you may have a copious layer of fat sitting right on top of your adobo broth which isn't appetizing at all.

Place meat and broth in separate containers and let cool for 15 minutes and then store in the fridge for at least 6 hours if not overnight to let the fat harden. Skim off the fat layer.

Variations:

Want chicken adobo? Easy, just substitute the 2lbs of pork butt for an equal amount of chicken parts. Bok bok.

If you can't oven braise (because your pan isn't oven safe), just simmer the meat and cooking liquid together for 30 minutes on medium to medium low.

If you want a no-fuss version, this can easily be cooked in a crock pot. Just dump the meat and marinade in the crock pot and set on low for 10 hours or high for 4 hours.

About the Ingredients

My preferred soy sauce is Kikkoman because it's great as both a cooking soy sauce and an eating soy sauce so I always have on hand. Feel free to use your favorite brand of soy sauce. I'd advise using low sodium soy sauce. That stuff is just nasty but if you must, you must.

If you live in an area with a Filipino market, you can find Filipino brands of vinegar. Personally, I don't bother as I'm not too fond of the taste. I blame my American palate. I just use the regular distilled white vinegar you find in the local American megamart since this is what my parents always used when I was growing up.

The pineapple juice is a departure from traditional ingredients but is seen in some in Filipino-Hawaiian recipes. I like it because it mellows out the salty soy sauce and sharp vinegar. Some recipes include brown sugar for the same effect. I don't use brown sugar because it carmelizes too much during the pan searing process.

Could you use lean cuts of meat like pork tenderloin or chicken breasts for adobo? Of course. But in doing so, you'll find that your meat will be tender but dry. In order to stay moist, the meat should have some fat on it even if you don't eat it.

For chicken adobo, I use thighs and drumsticks with the skin on and then remove the skin after cooking. Remember that chicken has a membrane on it that keeps fat from soaking into the meat so peeling off the cooked skin is fine.

For pork adobo, I use pork butt, trimming the pieces that are obviously far too fatty.